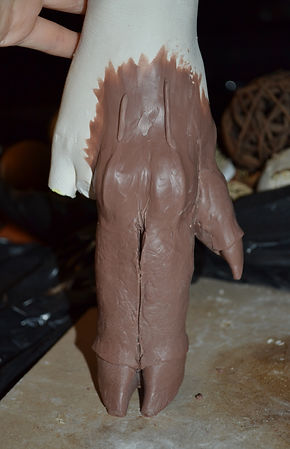
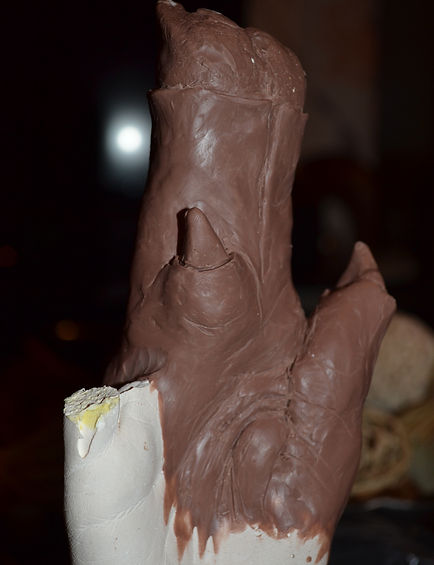
Hand Sculpt

An inspired makeup produced by Bill Turpin inspired me into wanting to produce a human hybrid character with a transformed hand. I have always wanted to create a different prosthetic, and I thought about producing one in my previous project but I didn't go ahead with it. I decided for this project that I wanted it to make my character look more realistic, and to add more effect to the outcome. The challenge is what scared me the most, how was I going to make it? what material could I make it out of it, and how was I going to make the mold. The possibilities of it going wrong worried me, and if I would run out of time and it would go all wrong. The idea of making something different is often approached cautiously as I didn't want to produce something that would be too difficult for me to do. Being a third year student, I wanted to see what the outcome would turn out like.
I wanted the hand to cover only the thumb, index finger and middle finger, purely because the ring finger and pinky were to stay exposed, so it demonstrated a human hybrid character.
The idea of creating it to look hoof-like, was because my character was a faun, so the hand had to look similar to what the animal would have. I knew this would be a challenging part of the project, but it also intrigued me into wanting to make something new and interesting. I also wanted to prove to myself that I can actually do it. A pigs trotter was used for reference as i didn't have a real goats foot to replicate a make believe creature.


1. The cast of the hand was ready to be sculpted onto with clay, I decided to go ahead with using monster clay for this, as i found it manageable to work with, and it didn't get stuck to your hand like most clays.
2. I started off with the top of the hoof, using the pigs trotter as reference, and with the help of melting the clay I was able to shape it very well. I then started moving the clay down toward the base of the fingers.
3. The thumb area was also molded onto the plaster hand so I could then determine how the joint in the thumb and index finger was going to form.
4 A close up of the thumb/joint , I decided I wanted the thumb to be slightly pointed so it replicated the little thumb limbs sticking out of the pigs trotter.


5. A close up side shot of the hoof part so far, and how thick I may want it. The plaster at this point was quite fragile so I had to be careful I didn't break it.
6. A close up view of the experimented texture I used for the hoof and joint. Using monster makers texturising pads. I also chizzeled away the ring finger as I didnt want undercuts.
7. I then decided the finger parts needed to be thicker and needed to form an M shape to show the depth between each finger, so I took some clay away whilst adding some on.
8. A close up of how I wanted the clay to form before it was all blended out smoothly.
9. Clay has now been built around the knuckle area, smoothed out slowly, built up around the thumb area, and also wanted to add depth around the hooves at the top.
10. Let's not forget the back of the hand, Although the front was going well, I needed to establish how the back was going to look, although not many reference ideas came to mind.
11. A close up of the side profile of the hand, and the thumb area now taking shape, by this stage it was looking really good, and I was happy with it.
12. The rolled sausage-like shapes area the hoof area was now smoothed and blended well to create depth, so it appeared the hoofs had grown out of the skin. I used sculpting tools to help with this.
13. Again a nice side profile of when it was becoming further blended and the depth was added around the thumb region to match the hooves at the top.
12. I added some more clay around areas that needed bulking out, and also added some smaller shapes around the knuckle areas to enhance the shape.
13. A lovely front view of the hand so far, all the clay has been carefully smoothed out around the knuckle areas, and blended out and the joint between the hand and thumb has been taken into consideration and shaped.
14. Words cannot describe how happy I was to see this sculpt like this. It was beginning to take shape, I carefully make an incision down the joint of where the two fingers would be, referencing my hand when together.
15. Here I tried to replicate tenons that run over the knuckle area and down the hand. So I added small sausage shapes over the hand, and blended them out slowly. The other finger was then taken off as It wasnt needed.
17. The two hoof surrounding areas were now fully blended around the exposing hooves, and smoothed out. I tried different lighting to see what it would look like in daylight.
18. The flash made all the detail and textures appear more prominent which looked brilliant, I was really happy with the progress of the hand so far.
20. Side view of the hand and thumb .
21. The idea on the back of the hand, was to replicate the creases in the human hand, so the hand was still partly human and partly animal, which was the intention.
22. overview of the hand.
23. The creases were blended out using sculpting tools to give an accurate appearance.
24. Angled image of the top of the hoof, added texture to replicate the pads.
25. The joint between the thumb and hand didn't appear correct to me, and I wanted it to appear smooth and subtle rather than a deep line to replcate depth. I decided to add some more clay and add subtle lines.
26. Side view of the joint in progress.
27. Close up of the joint.
30. The same method was applied around the thumb, so it appeared like it was exposed from skin. It was all carefully blended with sculpting tools.
31. At this stage I still wasn't happy with the back of the hand, and no matter how I positioned and blended the clay , I couldn't get the creases to look natural, although on pictures it looked better than in person.
32. The side profile of where the missing fingers were, the reason for this was because these fingers were to be exposed whilst the prosthetic covers the other two fingers and thumb.
33. The joint between the two fingers were subtle which is what I wanted it to look like so I was very happy with the appearance of this, and a bigger gap toward the base of the fingers replicated a human hand.
34. The thumb joint was a lot better now that I had carefully worked with the tools and smoothed out the creases.
36. The side view of the missing fingers. I really hoped that the prosthetic would turn out good because I wasn't sure whether the lack of fingers would make the prosthetic hard to get off of the hand.
35. At this point the hand is looking quite realistic, I have never sculpted a prosthetic for a hand before, but I really enjoyed creating it. Although the material I was sculpting onto could of been made out of of durable material. The knuckle areas has also been smoothed out to create depth and height.
38. The slit on the back needed to accurately match the front. But replicating a human hand, nobody has a vertically straight line between each finger. At this point, it was only touch ups and more texturising that was needed.


What did you like/dislike?
How can you improve?
I found working with the monster clay incredibly challenging and very addictive, when I first started forming the shape of the hooves, I wanted to finish it. I spent hours on it, and the end result turned out fab. The difficulty I discovered was the fact the plaster hand was very fragile, the fingers had to be re-glued on as during the molding stage they snapped, so I had to be careful not to presh too hard when smoothing out the clay around the fingers. The other problem i faced, was trying to create the creases on the underside of the hand, which replicated a human's hand. The more I built up, and took away, it started looking more like bulges rather than creases.
What I loved about making this hand, is having the time to make sure it was perfect, the texturing I was most proud of, and the fact I got so carried away with the claying that I forgot to take the first few pictures of the beginning of the sculpt.
There are a few points I would improve, firstly the hand would be made from a more durable material, such a resin, having experimented with the material, I should of made the entire hand from resin and worked with that instead of plaster, knowing the consequences of what plaster was like, I didn't want to waste all my resin on something that may not be used again, whereas plaster is a cheap material that can be disposed of after use.
I would also choose to sculpt an entire prosthetic instead of an application, the hand would be more of a prop than a prosthetic piece, this way I didn't have to worry about whether it would fit the model, and whether it would blend out. Maybe this would be something to consider for the next project.